Overview

When you log in, the navigation bar displays Activities and Reports. You may have other options based on your security access in the system.
- Activities: Add or update information about the activities you accomplish.
- Reports: Run reports that have been custom-built for your SHU or create your own reports.
Manage Activities
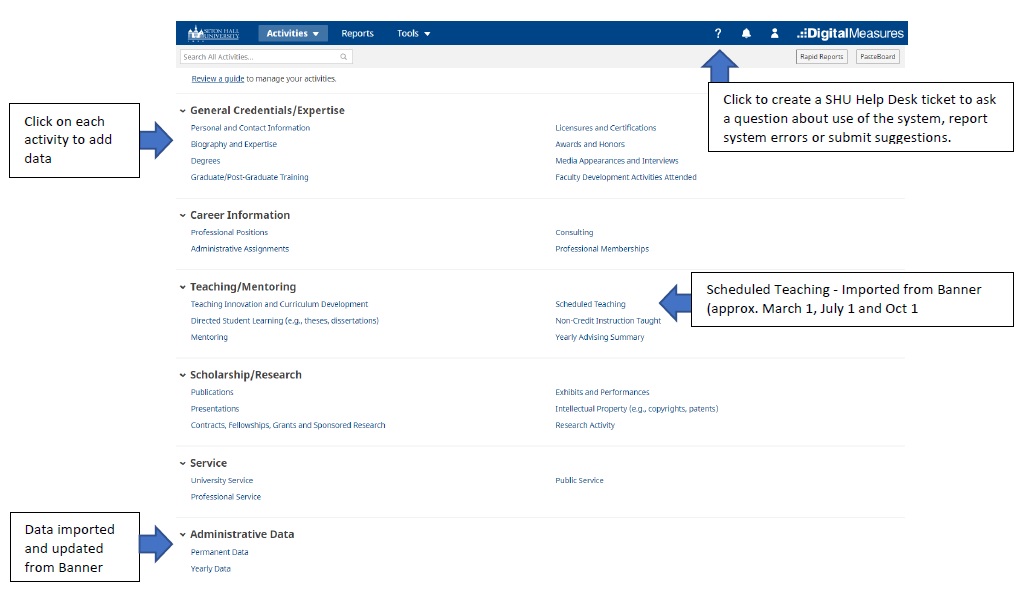
The Manage Activities Screen (see below) is organized into categories: General Credentials/Expertise,
Career Information, Teaching/Mentoring, Scholarship/Research, Service and Administrative
Data. When you first visit Manage Activities, spend a few minutes looking through
the screens (screenshots) to become familiar with each section and the information
stored on it.
Click on screenshot to expand.
At the top of the Manage Activities page are several links:
- Search All Activities: Enter keywords to search all of your records.
- Review a guide: Link to a universal Faculty Guide that is maintained by the vendor, Watermark Faculty Success. The content is included in this document.
- Rapid Reports: Provides you with quick and easy access to the reports you can run.
- PasteBoard: Allows you to copy text from another document (ex: your vita in MS Word) and paste it into the PasteBoard. You then select text from it, click-and hold on the text you selected, and drag it into a field in the system.
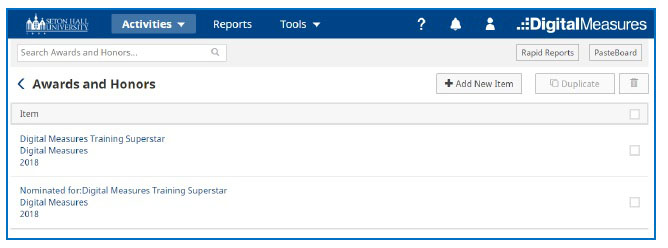
To access a screen, click its name and the summary screen displays records that are stored for that screen. Faculty are expected to add or update information about the activities they accomplish.

There are four possible actions you can take from the resulting screen, although not all of these actions will always be available:
- To add a new record, select the “Add New Item” button.
- To import items in bulk, select the “Import” button (available only for the Publications screen).
- To copy an existing record, check the box to the right of the item and select the “Duplicate” button. The system will create a duplicate record that you must then save in order to keep the copy.
- To delete a record, select the appropriate check box, and then select the button (can’t delete entries which have been imported for you from another system).
Important Note: Read-only records that you can view but not edit or delete have been added to the system. If records need revision, please click on “?” and submit a SHU Help Desk request.
Adding an Item
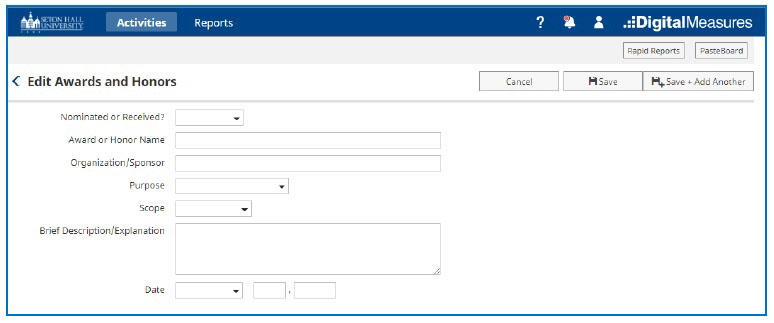
To add any activity, entry, services or record to a screen select the “Add New Item” button near the top of the screen. From there you will be navigated to the associated
screen (see below) to complete the fields. You are encouraged to complete as many
fields as possible that relate to the entry being added.

Important Note: When adding an item, make sure you enter the date associated with the entry. The date field is extremely important as most of the reports in the system pull based on dates.
Saving Records
When adding an activity, it is important to retain any entries/revisions by saving
your work. To preserve any work, select the “Save” or “Save + Add Another” button at the top of the screen. If you try to exit from a screen containing unsaved
changes, a warning message will display to determine whether you would like to return
to the screen and save your modifications before proceeding.
Duplicating an Item
In some cases, it may be helpful to duplicate an item and modify it instead of manually
entering the information again. On the summary page, click on the checkmark box for
the item you want to duplicate and click on the “Duplicate” button. It will copy the entry you selected and allow you to make edits where necessary
then save the record.
Removing an Item
To remove or delete an item from your list click on the checkmark box for the item
you wish to delete and then click on the “trash can” button.
Important Note: Once an item is removed from the system it can’t be retrieved. In instances where data has been imported from other systems on your behalf you will not have the option to remove an item.

